December 14, 2008 Welcome Home Bakers and Friends,Well, it's been quite a while since I wrote and sent out my last Diana's Desserts Newsletter and I must say a lot has changed in my life since the last edition (I should really say, in the last year or so). In case some of you are curious as to why I took a "hiatus", the reasons are: 1) I needed a break. 2) I decided to go on a strict diet to lose weight. 3) Basically, get myself into better health (including my diabetes). Joyfully (a great word for this time of year, or for that matter anytime of the year), I have succeeded in all of the above. In the last 14 months, I have lost 137 pounds. Yes, that's right 137 pounds. I went from 274 pounds (yes, that's right also) down to 137 pounds (approximately 62 kilos) as of today. This was on my own (with outstanding support from my husband Kenny), and later on with the help and great support of Weight Watchers (which as of November 14 of 2008, I was awarded my Weight Watchers Lifetime Membership). My diabetes is totally under control; no more diabetes medications, including insulin. I am so pleased to tell you this, and to tell anyone who suffers from diabetes that it IS possible to lose weight while on insulin. It's just takes a lot of hard work and determination. I am now back to working on my website and also enjoying desserts with less sugar and fat. But once in a while, it's alright to have a very rich treat or dessert, but it's all about moderation (how often and how much/portion control), isn't it? I've missed corresponding with those of you who have been visiting my website for several years and also I've missed meeting new guests to my site. So, welcome everyone and I hope you will continue to visit DianasDesserts.com and make some of the lovely desserts, breads and beverage recipes that are there for your pleasure. Now on to the Holiday recipes. Enjoy and Happy Hanukkah, Merry Christmas, Happy Kwanzaa and Happy New Year 2009! 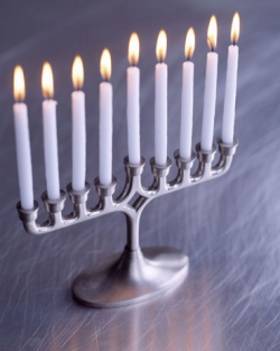
HANUKKAH*Also spelled Chanukah*Hanukkah or Chanukah begins at Sundown Sunday December 21, 2008 and lasts for 8 days until Sundown Monday December 29, 2008. The Story of Hanukkah Every year between the end of November and the end of December, Jewish people around the world celebrate the holiday of Hanukkah, the Festival of Lights. Hanukkah begins on the 25th day of the Hebrew month of Kislev, but the starting date on the western calendar varies from year to year. The holiday celebrates the events which took place over 2,300 years ago in the land of Judea, which is now Israel. Long ago in the land of Judea there was a Syrian king, Antiochus. The king ordered the Jewish people to reject their God, their religion, their customs and their beliefs and to worship the Greek gods. There were some who did as they were told, but many refused. One who refused was Judah Maccabee. Judah and his four brothers formed an army and chose as their name the word "Maccabee", which means hammer. After three years of fighting, the Maccabees were finally successful in driving the Syrians out of Israel and reclaimed the Temple in Jerusalem. The Maccabees wanted to clean the building and to remove the hated Greek symbols and statues. On the 25th day of the month of Kislev, the job was finished and the temple was rededicated. When Judah and his followers finished cleaning the temple, they wanted to light the eternal light, known as the N'er Tamid, which is present in every Jewish house of worship. Once lit, the oil lamp should never be extinguished. Only a tiny jug of oil was found with only enough for a single day. The oil lamp was filled and lit. Then a miracle occurred as the tiny amount of oil stayed lit not for one day, but for eight days. Jews celebrate Hanukkah to mark the victory over the Syrians and the rededication of the Jerusalem Temple. The Festival of the Lights, Hanukkah, lasts for eight days to commemorate the miracle of the oil. The word Hanukkah means "rededication". In America, families celebrate Hanukkah at home. They give and receive gifts, decorate the house, entertain friends and family, eat special foods, and light the holiday menorah. Source: Holidays on the Net Hanukkah Recipes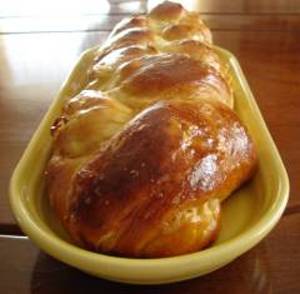
Braided Apple Challah for HanukkahServings: Makes 1 large loaf or 2 small loavesComments: Use Bread Machine for Making Dough - Bake Bread in Traditional Oven Braiding your challah for Hanukkah is traditional but adding apples to the dough is something a little bit different. Usually the challah is topped with poppy or sesame seeds but this recipe omits adding the seeds for the topping and instead this challah is full of little pieces of diced apples inside. Your guests will enjoy the little bits of apple in the challah as it's something a bit unusual for Hanukkah, but more typical for Rosh Hashanah. If you want to make this apple challah for Rosh Hashanah, make round loaves instead. Enjoy! Ingredients: 3/4 cup warm water (110 degrees F/43 degrees C) 1 large egg 3 tablespoons butter or margarine, cut into small pieces, or 2 tablespoons vegetable oil 1 1/4 teaspoons salt 3 cups bread flour (unbleached all-pupose flour may be substituted for the bread flour, if needed) 1 tablespoon granulated sugar 2 tablespoons clear honey 2 teaspoons bread machine yeast or instant yeast 1/2 cup diced dried apples* (see notes below) or 1/2 cup fresh diced apples Egg Wash: 2 large egg yolks 2 tablespoons water Instructions: Notes: You will need 1 large or 2 medium size baking sheets if making 2 smaller loaves (or one very large baking sheet will work also). Dried diced apples may be purchased online at The Prepared Pantry. Their web address is: http://www.preparedpantry.com. 1. Lightly grease or line with parchment paper one or two baking sheets. 2. Add warm water, egg, butter (or margarine or vegetable oil, if using), salt, flour, sugar, honey, and yeast to bread machine pan in the order recommended by manufacturer. Select the Dough Cycle of your machine. Start the cycle. 3. When dough cycle is complete, remove dough from machine to a lightly floured work surface. Punch dough down and let rest for 5 minutes. If necessary, knead in enough flour to make dough easy to handle. Knead in diced apples. 4. Making 1 loaf: If making one (1 1/2-pound) loaf, divide dough into 3 equal size pieces and roll each piece into 20-inch long rope. Place ropes on prepared baking sheet. Braid by bringing left rope under center rope; lay it down. Bring right rope under new center rope; lay it down. Repeat braiding to the end of loaf. Pinch ends to seal and tuck under dough. Making 2 smaller loaves: If making two (3/4 pound) smaller loaves, divide dough in half. For each loaf, divide dough into 3 equal size pieces and roll each piece into a 12-inch long rope (you will have 6 ropes if making 2 smaller loaves). Place ropes on prepared baking sheets. Braid by bringing left rope under center rope; lay it down. Bring right rope under new center rope; lay it down. Repeat braiding to the end of loaf. Pinch ends to seal and tuck under dough. Repeat braiding with remaining 3 ropes for second loaf. 5. Egg Wash: Lightly beat egg yolks with water. Brush loaf (s) with half of the egg wash, saving the remaining egg wash to brush loaf (s) again before baking. Cover with plastic wrap and place a smooth cotton kitchen towel over plastic wrap and let loaf (s) rise in a warm, draft-free place until almost doubled in size, 45 to 50 minutes. 6. Preheat oven to 375 degrees F/190 degrees C. 7. Baking: Brush loaf (s) with the remaining egg wash, REDUCE oven temperature to 350 degrees F/180 degrees C and bake for 30 to 35 minutes or until done (bread is done if it registers 190 degrees F/87 degrees C with instant-read thermometer). Remove bread from baking sheet and cool completely on wire rack (about 2 hours). Tip: Cover bread with aluminum foil after 10 to 15 minutes of baking to prevent excess browning (for even browning when baking two loaves, switch positions of sheets halfway through baking). Storage: Bread may be frozen once cooled completely (2 hours). Wrap in aluminum foil, then place bread in a ziploc bag. Label and date. Bread can be frozen for up to 3 months. Thaw for 1 hour at room temperature before serving. Makes 1 (1 1/2-pound) loaf or 2 small (3/4 pound) loaves. Photograph taken by Diana Baker Woodall© 2006 Source: DianasDesserts.com 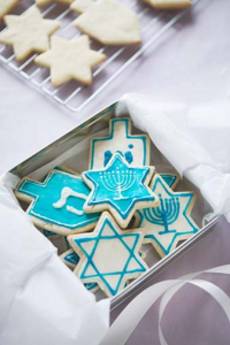
Star of David and Dreidel Hanukkah CookiesComments:If you're planning to make cookies for a Hanukkah treat, remember to buy dreidel and star of david shaped (6 pointed star) cookie cutters before the holiday gets here. You can usually find these cutters online. Just put in a search on Google. Tip: You can find dreidel and 6 pointed star cookie cutters and other Jewish holiday cookie cutters at www.amazon.com. Ingredients: 1/2 cup (1 stick/4 oz/113g) unsalted butter, softened 1 (3 ounce) package cream cheese 1/2 cup granulated sugar 1/4 cup honey 1 egg 1/2 teaspoon vanilla extract 2-1/2 cups all-purpose flour 1/3 cup finely ground walnuts 1 teaspoon baking powder 1/4 teaspoon salt Assorted colored icings, sprinkles and colored sugars Instructions: 1. Beat butter, cream cheese, sugar, honey, egg and vanilla in large bowl at medium speed of electric mixer until creamy. Stir in flour, walnuts, baking powder and salt until well blended. Form dough into ball; wrap in plastic wrap and flatten. Refrigerate about 2 hours or until firm. 2. Preheat oven to 350 degrees F (180 degrees C). Lightly grease cookie sheets. Roll out dough, small portion at a time, to 1/4-inch thickness on floured surface with lightly floured rolling pin. (Keep remaining dough wrapped in refrigerator.) Cut dough with 2-1/2-inch to 3-inch dreidel-shaped cookie cutter and 6-pointed star cookie cutter. Place 2 inches apart on prepared cookie sheets. 3. Bake 8 to 10 minutes or until edges are lightly browned. Let cookies stand on cookie sheets 1 to 2 minutes; transfer to wire racks to cool completely. 4. Decorate cookies with colored icings, sprinkles and colored sugars (blue and white are the most traditional Hanukkah colors, but you can use your imagination when decorating cookies). Makes 3 1/2 dozen cookies. 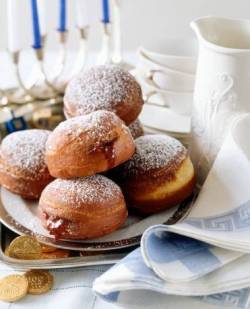
Suffanyiot for HanukkahServings: Makes 16 sufganyiots (jelly filled doughnuts)Comments: These yummy, golden brown sweet rolls are like doughnuts, but are filled with either jelly, jam or chocolate spread, such as nutella. During Hanukkah, Israeli vendors sell sufganyiot by the basketfuls. Ingredients: 3/4 cup water 1 large egg 4 teaspoons cooking oil 1/2 teaspoon vanilla extract 3 cups bread flour 1/4 cup granulated sugar 1/2 teaspoon salt 1/4 teaspoon ground cinnamon 1 1/4 teaspoons active dry yeast, instant yeast, or bread machine yeast 1/4 cup chocolate hazelnut spread (nutella) or fruit preserves, jam or jelly, such as seedless red raspberry or blackberry Cooking oil for deep-fat frying Sifted confectioners' sugar Instructions: 1. Add the first 9 ingredients to a 1 1/2 or 2-pound bread machine according to the manufacturer's directions. Select the dough cycle. When cycle is complete, remove dough from machine. Punch down. Cover and let rest for 10 minutes. 2. Divide the dough in half. On a lightly floured surface, roll each portion to 1/4-inch thickness. Cut dough with a floured 2 1/2-inch biscuit cutter, dipping cutter into flour between cuts. Re-roll and cut trimmings. Place about 1/2 teaspoon chocolate spread, fruit preserves, jam or jelly onto the center of half of the circles. Lightly moisten edges of circles; top with remaining circles. Press edges together with fingers or tines of a fork to seal. 3. Fry doughnuts, 2 or 3 at a time, in deep hot oil (365 degrees F/185 degrees C) for about 2 minutes or until golden brown, turning once. Using a slotted spoon, remove from oil and drain on paper towels. Sprinkle with confectioners' sugar. Transfer to wire racks to cool. Makes 16 sufganyiot. Source: DianasDesserts.com 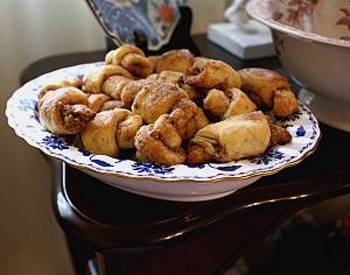
Walnut and Brown Sugar Filled RugelachServings: Makes 4 dozen rugelach cookiesComments: This tasty variation on a Jewish favorite combines walnuts, granulated sugar AND brown sugar for the filling instead of the traditional walnuts and just granulated sugar. The dough, made with cream cheese is extremely light and flakey. One bite and you're in "heaven". The rugelach are also delicious made with pecans or hazelnuts. They make a "must have" treat for Hanukkah. Ingredients: For the Pastry: 1 cup (2 sticks/8 oz./226g) unsalted butter, at room temperature 8 ounces cream cheese, at room temperature 1/4 tsp. salt 2 cups all-purpose flour For the Filling: 1 1/2 cups walnuts, toasted and finely ground *(see note below) 1/3 cup brown sugar, firmly packed 1/3 cup granulated sugar 2 tsp. ground cinnamon 1/4 cup (1/2 stick/2 oz./56g) unsalted butter, melted and cooled For the Topping: 1/4 cup granulated sugar 3/4 tsp. ground cinnamon Egg Wash: 1 egg white, beaten with 1 tbsp. water Instructions: Note: To Toast Walnuts: Spread walnuts in a single layer on an ungreased baking sheet; bake in preheated 350 degrees F/180 degrees C oven 8 to 10 minutes or until golden brown, stirring frequently. Remove nuts from baking sheet to cool. To Grind Walnuts: Place in food processor. Process using on/off pulsing action until finely ground, but not pasty. Place ground walnuts on a plate or in a bowl and set aside. To Make the Pastry: In a large bowl, combine the butter and cream cheese. Using an electric mixer set on high speed, beat until smooth. Mix in the salt. Reduce the speed to low, add the flour, and mix just until a dough forms. Turn the dough out onto a floured work surface. Using floured hands, form the dough into a log. Cut into 4 equal pieces. Flatten each piece into a disk and wrap each disk in plastic wrap. Refrigerate until firm, at least 2 hours or as long as overnight. Preheat oven to 375 degrees F/190 degrees C. To Make the Filling and To Assemble Rugelach: Line two large baking sheets with parchment paper. Set aside. Remove dough disks from the refrigerator. Unwrap the dough disks and let stand at room temperature for about 10 minutes to soften slightly. Meanwhile, in a small bowl, mix together the brown sugar, granulated sugar and ground cinnamon. Flour one dough disk and place between two sheets of waxed paper. With a rolling pin, roll out into a round 10 inches in diameter and 1/8 inch thick. Remove the top sheet and brush the dough with the melted butter, then sprinkle with 3 tbsp. of the sugar mixture. Top with about 1/3 cup of the finely ground walnuts (pressing mixture into the dough to help it adhere to the dough). Using a pizza cutter or a sharp knife cut the round into 12 wedges. Starting at the wide end, roll up each wedge, jelly-roll style. Transfer to prepared baking sheet, arranging the cookies point-side down and spacing them at least one inch apart. To Make the Topping: In a small bowl, mix together the granulated sugar and ground cinnamon. Using a pastry brush, brush the cookies with the egg white/water egg wash, then sprinkle with the cinnamon-sugar topping. Bake until golden brown, about 18 to 20 minutes. Transfer the cookies to wire racks to cool. Repeat with the remaining dough, filling and topping. The rugelach can be stored in an airtight container at room temperature for up to 5 days. Makes about 4 dozen rugelach cookies. Photograph taken by Diana Baker Woodall© 2006 
CHRISTMAS*Christmas 2008 is celebrated on Thursday December 25th.What is Christmas? Beyond the trees and poinsettia, Beyond the bows and wrapping paper, Beyond the sounds of carolers and smells of gingerbread, Beyond the armloads of gifts and the grim reality of credit card bills, Beyond red-suit clad Santa’s and tiny angels adorned with aluminum foil halos, Ever wondered what Christmas was all about? Far from the glamorous festivities that mark today's holiday celebrations, the first Christmas proved the humblest of events. A couple engaged, but not yet married, traveled to a distant city to pay taxes. Adding to the rigors of the journey was the woman's very-pregnant condition. Despite her state, she claimed to be a virgin and said the child she carried was the Son of God, not the product of any human relationship. How the tongues must have wagged in ancient Palestine! Probably they questioned her sanity. Certainly they challenged her morality. And they must have wondered about the intelligence of her husband-to-be. What sort of man would marry a woman about to have a child which was not his? Whatever the community thought, Mary knew the truth. Joseph initially doubted his bride-to-be's fantastical story, but an angel appeared to him one night and told him that the child was indeed God's and that his fiancée was pure and honorable, a suitable wife. After that night, Joseph needed no more convincing. Together, the couple made plans for their new life as one flesh, and for the addition that was soon to grace their family. That meant obeying Caesar and paying taxes. Yet when the twosome reached the city, they could find nowhere to stay. Every room in the city was taken. Mary's condition complicated matters. The child was ready to be born. And as any woman who has ever given birth knows, babies don't delay their arrivals because of inadequate facilities. Finding no other shelter, Joseph and Mary settled for a stable--a common barn filled with animals and the accompanying smells. The baby came, but no soft receiving blankets graced his skin. No sterile crib awaited the squirming newborn. Mary did the best she could for her baby. She wrapped him in strips of cloth and laid him in the softest spot the barn offered--a trough filled with hay. Glamorous? No. Festive? Hardly. But glorious? Yes. A thousand times yes. You see, like any proud father, the infant's Father--God Himself--hastened to announce His Son's birth. Yet unlike any other father, He proclaimed the good news as only God could. Without warning, the night sky over Bethlehem came alive. An angel split the night-sky, hovering over a pasture filled with shepherds. Fear gripped their hearts, but the heavenly visitor immediately spoke peace. "Do not be afraid. I bring you good news of great joy that will be for all the people. Today in the town of David a Savior has been born to you; he is Christ the Lord. This will be a sign to you: You will find a baby wrapped in cloths and lying in a manger." Before they had time to regain their composure, similar creatures literally filled the sky. And angelic praise shattered the typical evening quiet. The shepherds probably didn't think twice. Who would have under the circumstances? Abandoning their flocks, they headed back into Bethlehem. They didn't stop until they found the child about whom the angels sang. Then, there in the barn, they worshipped the newborn King. Source: theholidayzone.com Christmas Recipes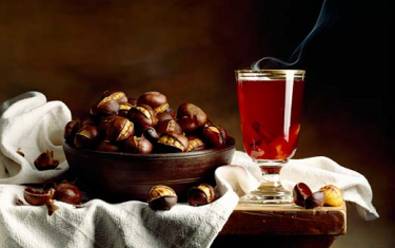
Roasted Chestnuts for ChristmasServings: 1 1/2 to 2 pounds, 8 to 10 servingsComments: For a Christmas celebration, roasted chestnuts always add a cheery addition to appetizers, snacks or serving with desserts. Ingredients: 1 1/2 to 2 pounds whole chestnuts in shell 1 teaspoon vegetable oil 1/4 cup water Special equipment: a chestnut knife (optional); a large heavy skillet (preferably cast-iron) with a lid Instructions: Make a large X in each chestnut with chestnut knife or a sharp paring knife, cutting through shell. Toss chestnuts with oil in a bowl. Heat dry skillet over moderately low heat until hot, then roast chestnuts in skillet on stovetop, covered, stirring every few minutes, 15 minutes. Add water and continue to roast, covered, stirring occasionally, until water is evaporated and chestnuts are tender, about 5 minutes more. Serve hot. Makes 8 to 10 servings. 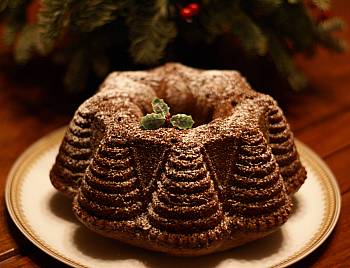
Christmas Gingerbread CakeServings: 10-12Comments: A moist and delicious gingerbread cake for the holidays. This tasty cake can be enjoyed by everyone, not just people who are diabetic or people on a low carbohydrate or low-fat diet. All your guests will love this cake and nobody will know that there is "no sugar added" to it. Ingredients: 2 cups unsweetened applesauce 3/4 cup unsulphured molasses (not blackstrap) 1/3 cup vegetable oil 3 eggs 3 cups all-purpose flour 1 1/3 cups Splenda Granulated No Calorie Sweetener (you may use any other sugar-free artificial sweetener that can be used for baking, such as Equal) 2 teaspoons baking soda 1 teaspoon baking powder 1/2 teaspoon salt 2 teaspoons ground ginger 1 1/2 teaspoons ground cinnamon 1/2 teaspoon ground cloves Confectioners' sugar, for dusting top of cake (optional) Serve with: Fat-free, sugar-free or lite non-dairy whipped topping, thawed or Fat-Free or Sugar-Free Whipped Cream Instructions: 1. Preheat oven to 350 degrees F/180 degrees C. Spray a 10 cup (10-inch) bundt pan with butter-flavored cooking spray. Set aside. 2. Pour applesauce, molasses, and vegetable oil into a large mixing bowl. Add eggs. Stir well. 3. Blend remaining dry ingredients in a separate bowl. Mix well. 4. Add dry ingredients to the applesauce mixture. Stir well. 5. Pour cake batter into prepared pan. Bake in preheated oven for 50 to 60 minutes, or until a toothpick inserted in the center comes out clean. Remove from oven. Cool cake in pan on a wire rack for approximately 20 minutes. Invert cake onto serving plate. When ready to serve, dust cake with a little confectioners' sugar (optional), and serve with non-dairy whipped topping or fat-free or unsweetened whipped cream. Makes 18 servings. Note from Diana: This cake will serve 18 people, but the slices will be quite small. I would say that it will serve more like 10-12 people. If you are watching your carbohydrate intake, have a smaller slice (1/18 of cake). Nutritional Information (per serving) Makes 18 servings Calories: 170 Calories from Fat: 45 Protein: 3g Total Fat: 5g Saturated Fat: 1g Carbohydrates: 29g Fiber: 1g Cholesterol: 35mg Sodium: 240mg Sugar: 11g Dietary Exchanges: 2 carbohydrate servings 1 fat serving Photograph taken by Diana Baker Woodall © 2007 Source: DianasDesserts.com 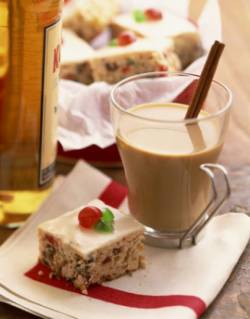
Applesauce Fruitcake Bars with Caramel IcingServings: Makes 48 barsComments: A quick and easy treat for Christmas Eve or Christmas Day. Making these little fruitcake bars will give you more time to spend with your guests, instead of spending your time in the kitchen baking all day. Note: I like to ice these bars with Caramel Icing, but if desired, you can dust top of bars with confectioners' sugar instead. The recipe for Caramel Icing is included below. Ingredients: 1 (14-ounce) can sweetened condensed milk 2 large eggs 1/4 cup (1/2 stick/2 oz./56g) unsalted margarine or butter, melted 2 teaspoons vanilla extract 3 cups biscuit baking mix 1 (15-ounce) jar applesauce (sweetened or unsweetened) 1 cup chopped dates 1 (6-ounce) container green candied cherries, chopped 1 (6-ounce) container red candied cherries, chopped 1 cup chopped nuts (walnuts or pecans are good) 1 cup raisins Confectioners' sugar For Caramel Icing (optional) 1 cup dark brown sugar, firmly packed 1/2 cup evaporated milk 2 1/2 tablespoons (1.25 oz/35g) butter or stick margarine 2 teaspoons light-colored corn syrup (such as Karo Light Syrup) Dash of salt 2 cups confectioners' sugar 2 1/2 teaspoons vanilla extract Garnish (optional) 24 candied (glace) red and green cherries, cut in half Instructions: Preheat oven to 325 degrees F/160 degrees C. Grease and flour a 15 x 10-inch jelly roll pan. In bowl of an electric mixer, beat condensed milk, eggs, margarine and vanilla. Stir in remaining ingredients except confectioners' sugar. Spread mixture evenly into prepared jelly roll pan. Bake in preheated oven for 35 to 40 minutes or until wooden pick inserted in center comes out clean. Cool thoroughly before spreading with caramel icing (if using). If desired, garnish with candied cherry halves after cutting into bars. If not making icing, sprinkle with confectioners' sugar. Cut into bars. Store tightly covered at room temperature. Caramel Icing Instructions: Combine brown sugar and next 4 ingredients (brown sugar through salt) in a medium saucepan, and bring to a boil over medium-high heat, stirring constantly. Reduce heat, and simmer until thick (about 5 minutes), stirring occasionally. Remove from heat. Add confectioners' sugar and the vanilla extract; beat at medium speed of an electric mixer until smooth and slightly warm. Cool 2 to 3 minutes (icing will be thin but thickens as it cools). Using a spatula, spread icing over cooled fruitcake bars before slicing. Makes 48 bars. Source: DianasDesserts.com 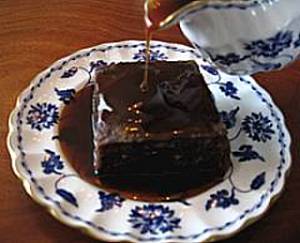
Chocolate Sticky Toffee PuddingServings: 8-12Comments: History of Sticky Toffee Pudding Originally called "icky sticky toffee sponge", Sticky Toffee Pudding is a British dessert composed of a moist sponge cake made with fine chopped dates (sometimes pureed) and then covered with a toffee sauce. The dessert's origins are considered a "mystery" according to the gastronomic journal, Saveur, however the dominant story is that Francis Coulson developed and served this dessert at his Sharrow Bay Country House Hotel near the Scottish border in the 1960's or early 1970's. It has been stated by Coulson's former protege and chef, Johnnie Martin, that Coulson hinted that the original concept for the dessert was derived from a farmwife in Lancashire, England. However it was also found that the Landlady of The Gait Inn, Millington, invented it in 1907 and was then sold in the pub much to everyone's delight. In any case, Coulson introduced and refined the dessert to the general public making his recipe completely accessible to all those who asked. Source: wikipedia.com This version of Sticky Toffee Pudding is a little bit different in the sense that it has grated bittersweet chocolate added to the batter. A definite "plus" for your chocoholic guests. I suggest serving the pudding warm and with a scoop of vanilla ice cream or a big dollop of whipped cream. It is so yummy and so addicting that your guests will want the recipe. By all means, give the recipe out whenever asked as everyone should try this scrumptious pudding at least once.......Diana, Diana's Desserts Ingredients: For Pudding: 8 oz. pitted dates, chopped 1 1/4 cups water 1 teaspoon baking soda 1/4 cup (1/2 stick/2oz/56g) butter, softened 3/4 cup dark brown sugar, firmly packed 2 eggs 1 cup self-rising flour 3 oz. bittersweet chocolate, grated For Sauce: 1 cup heavy cream 1 cup dark brown sugar, firmly packed 1/2 cup (1 stick/4 oz./113g) butter Garnish: Confectioners' sugar (optional) Instructions: 1. Preheat oven to 350 degrees F (180 degrees C). Butter (or use cooking spray) and line with parchment paper an 8-inch round or square cake pan. Butter (or use cooking spray) parchment paper also. 2. Place the pitted and chopped dates and water in a saucepan and bring to a boil. 3. Remove date/water mixture from heat, stir in the baking soda (mixture will foam up), and let stand for 5 minutes. Purée date mixture in blender or food processor until smooth. Set aside. 4. With an electric mixer cream the butter and sugar. Add the eggs, one at a time, and beat well. 5. With a wooden spoon fold in the flour, the puréed date mixture, followed by the grated chocolate. 6. Pour the mixture into prepared cake pan (or you may use six to eight individual ramekins, pudding molds or muffin tins). Bake in preheated 350 degree F (180 C) oven for 55 minutes or 25 minutes for individual puddings. 7. Prepare the sauce by placing the cream, brown sugar and butter in a saucepan. Stir over low heat until the sugar dissolves. Bring to a boil, then reduce the heat and simmer for 5 minutes. 8. Remove the pudding from oven and let stand for 10 minutes in pan. Leave oven on. Turn pudding out onto a baking sheet. Pour over enough of the sauce to cover the top of the pudding. Return to the oven for 5 minutes. 9. Dust the pudding with confectioners' sugar. Cut pudding into squares or wedges and pour remaining sauce over slices of pudding. Serve with vanilla ice cream, whipped cream or creme fraiche. Make-Ahead Note: This pudding can be kept for 1 week in the refrigerator. Heat single slices with sauce poured over in the microwave on High (100% power) for approximately 1 minute. Photograph taken by Diana Baker Woodall© 2005 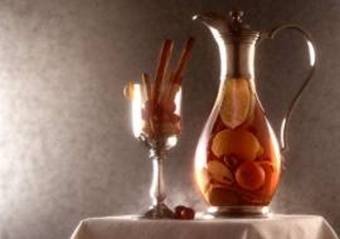
Christmas Mulled CiderServings: 6Comments: A warm, cheerful drink to serve to your guests on Christmas Eve or Christmas Day. Ingredients: 1 large lemon, cut in half 1 small lime, cut in half 1 medium orange, cut in half 16 whole cloves 4 cups clear apple juice or apple cider 1/2-3/4 cup honey 4 (2-inch.) cinnamon sticks 1/4 tsp. ground ginger Instructions: Cut two slices (1/4-inch thick) from each lemon, lime, and orange half. Insert whole cloves into slices; set aside. Squeeze juice from remainder of fruit halves into a medium non-reactive saucepan. Stir in apple juice and honey; mix well. Add cinnamon sticks, ginger and reserved fruit slices. Bring just to a boil over medium-high heat. If desired, strain cider, and place 1 or 2 cinnamon sticks in glass or cup. Serve immediately in a heatproof serving bowl. Makes 6 servings. Note: If desired, a little brandy or apple brandy can be added to cider for that extra flavor and warmness. Source: DianasDesserts.com 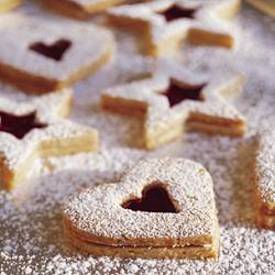
Linzer Christmas CookiesServings: Makes 1 dozenComments: Linzertorte Though it's now famous around the world, the motherland of this elegant, rich tart is Linz, Austria. Ground almonds, grated lemon rind and spices add their magic to the buttery crust, which is spread with jam (usually raspberry) before being topped with a lattice of crust. After baking, the tart is served at room temperature. Linzer Cookies The Linzer Cookie is the cookie variation of the famous Linzertorte; two cookies sandwiched together with a seedless jam (usually raspberry), and then topped with a dusting of confectioners' sugar. A delicious and very pretty cookie to serve during the holidays, and one that makes a lovely Christmas gift. Ingredients: 1 cup hazelnuts or slivered almonds, toasted and skinned* (See "How to Toast and Skin Nuts" below) 8 tbsp. (1 stick/4 oz.113g) unsalted butter, at room temperature 1/2 cup granulated sugar 1 egg yolk 1 tsp. finely grated orange or lemon zest 3/4 tsp. vanilla extract 1/4 tsp. almond extract 1 cup all-purpose flour 1/2 tsp. ground cinnamon 1/4 tsp. salt About 1/4 cup seedless raspberry jam Confectioners’ sugar for dusting Instructions: In a food processor, finely grind the toasted hazelnuts using short pulses. Set aside. In a large bowl, using an electric mixer, beat the butter on high speed until fluffy and pale yellow. Add the granulated sugar and continue beating until combined. Reduce the speed to low. Add the egg yolk, orange zest, vanilla and almond extract and beat until blended. Sift together the flour, cinnamon and salt into another bowl. Add the ground hazelnuts and stir to blend. Add the flour mixture to the butter mixture and beat on low speed or stir with a wooden spoon until blended. The dough should be soft. Turn the dough out onto a work surface, divide into 4 equal portions and wrap each in plastic wrap. Refrigerate until chilled, about 1 hour. Preheat oven to 350 degrees F (180 degrees C). Lightly grease 2 baking sheets or line with parchment paper. Remove 1 portion of the dough at a time from the refrigerator, place between 2 sheets of waxed paper and roll out 1/4 inch thick. Using a cookie cutter about 2 1/2 inches in diameter, cut out the cookies. Using a 1 1/4-inch cutter, cut a hole in the center of half of the cookies. Repeat with the remaining portions of dough, then reroll the dough scraps as needed to make 24 cutouts total, cutting holes in half of them. If the dough becomes sticky, wrap it in plastic wrap and freeze for 10 minutes before rolling out. Using a thin spatula, carefully transfer the cookies to the prepared baking sheets. Bake until the cookies are firm to the touch, about 12 minutes. Transfer the baking sheets to wire racks. Loosen the cookies with the spatula, but leave the cookies on the sheets until thoroughly cooled. To assemble, spread the solid cookies with a thin layer (about 1 tsp.) of raspberry jam to within about 1/4 inch of the edges. Dust the cutout cookies generously with confectioners’ sugar. Top the solid cookies with the cutout cookies. Makes 1 dozen cookies. Note: How to Toast and Skin Nuts To toast nuts, preheat oven to 325 degrees F (160 degrees C). Spread the nuts in a single layer on a baking sheet and toast in the oven, stirring occasionally, until the nuts are fragrant and golden (or their papery skin starts to crack). Depending on the type and size of the nuts, this will take 10 to 20 minutes. Start checking after 10 minutes. The moment the nuts come out of the oven, pour them onto a plate to cool. They will continue to toast and may burn if left on the hot baking sheet. To remove skins of nuts such as hazelnuts, rub them while still warm in a clean kitchen towel. Source: DianasDesserts.com 
KWANZAA*Kwanzaa begins on December 26, 2008 and continues until New Years Day, January 1, 2009The Festival of Kwanzaa Kwanzaa is a 7 day festival celebrating the African American people, their culture and their history. It is a time of celebration, community gathering, and reflection. A time of endings and beginnings. Kwanzaa begins on December 26th, the day after Christmas and continues until New Years Day, January 1st. Each evening a family member, usually the youngest child, lights candles in a special candleholder and discusses one of the seven principles of Kwanzaa. On the sixth day, which falls on New Years Eve, family and friends get together to enjoy a large feast and to celebrate their history, culture, and the upcoming new year. The holiday of Kwanzaa was created by Dr. Maulana Karenga in 1966, during the period of US history in which African Americans were involved in struggles for their civil rights. This was the period of Martin Luther King, the Civil Rights movement, and Black Power. Dr. Karenga wanted to create a holiday that would bring African Americans together in celebration of their black culture. He was inspired by the "first fruit" or harvest festivals that were celebrated throughout Africa. In fact the name he gave to the holiday, "Kwanzaa," comes from the Kiswahili phrase for "first fruit" - matunda ya kwanza. (Kiswahili, or Swahili, is the largest spoken language on the African continent and thus the language of Kwanzaa). When Dr. Karenga chose the word "kwanza" for the name of his festival he added the extra "a" at the end to give the word greater significance. Dr. Karenga used these first fruit festivals as his model for Kwanzaa because they shared characteristics which he felt were important. These characteristics were: 1. The people gathered together to celebrate their crops and harvest 2. The people would give thanks to their Creator for a good harvest and life. 3. They would remember and celebrate their ancestors and the past. 4. They allowed the people to recommit themselves to their community. 5. They celebrated their history, culture, Creator, and the promise of the next year. It was these characteristics that inspired Dr. Karenga when he developed the Nguzo Saba, or Seven Principles, of Kwanzaa. (Nguzo Saba is Kiswahili for "Seven Principles") These principles are unity, self-determination, collective work and responsibility, cooperative economics, purpose, creativity, and faith. These are the foundation of Kwanzaa. The dates of the celebration, December 26 - January 1, were chosen to correspond to the end of the year celebrations in America. Kwanzaa begins the day after Christmas. This to bypass the commercial buying period but to take advantage of the seasonal holiday spirit. Source: Holidays on the Net Kwanzaa Recipes
Benne Cakes for KwanzaaServings: 3 dozenComments: Benne cakes are traditionally associated with the Deep South, where bennes – sesame seeds – are considered good luck. The recipe actually originated in West Africa, and is enjoyed the world over for its wonderful taste. Wafers and cookies made from benne are now a part of Kwanzaa ("first fruit" in Swahili), the African-American family festival that lasts from December 26 through January 1. Serve these crunchy little cakes ( also called wafers) at your Kwanzaa parties and celebrations as a delicious appetizer before the meal. Ingredients: 1 cup brown sugar, firmly packed 1/4 cup unsalted butter, softened 1 egg, beaten 1 teaspoon pure vanilla extract 1 teaspoon freshly squeezed lemon juice 1/2 cup all-purpose flour 1/2 teaspoon baking powder 1/4 teaspoon salt 1 cup toasted sesame seeds Instructions: Preheat the oven to 325 degrees (160 C) and lightly grease a cookie sheet. In a large bowl, cream the butter and sugar until light and fluffy. Beat in the egg, vanilla and lemon juice. In a small bowl, whisk the flour, baking powder and salt. Mix the dry ingredients into the butter mixture and stir in the sesame seeds. Drop by the teaspoonful onto the prepared cookie sheet about two inches apart. Bake for 15 minutes, or until the edges are lightly browned. Makes 3 dozen Benne Cakes. 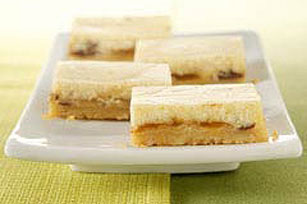
Kwanzaa Praline SquaresServings: Makes 32 squaresComments: Serve these tasty praline squares anytime during the week long celebration of Kwanzaa, as a lunch time goody or as a delicious dessert at your Kwanzaa dinner. I guarantee that kids and adults alike will love them. Ingredients: 3/4 cup (1 1/2 sticks/6 oz./170 grams) butter or margarine, softened 1 cup granulated sugar, divided 1 tsp. vanilla extract, divided 1 1/2 cups all-purpose flour 2 packages (8 oz. each) cream cheese, softened 2 eggs 1/2 cup toffee bits 3 tbsp. caramel ice cream topping Instructions: Preheat oven to 350 degrees F/180 degrees C. Beat butter, 1/2 cup of the sugar and 1/2 tsp. of the vanilla extract in large bowl with electric mixer on medium speed until light and fluffy. Gradually add flour, beating on low speed after each addition until well blended. Press firmly onto bottom of 9 x 13-inch baking pan. Bake 20 to 23 minutes or until lightly browned. Beat cream cheese, remaining 1/2 cup sugar and remaining 1/2 tsp. vanilla extract in large bowl with electric mixer on medium speed until well blended. Add eggs; mix well. Stir in toffee bits. Pour over crust. Drop teaspoonfuls of the caramel topping evenly over cream cheese mixture. Cut through batter several times with knife for marble effect. Bake for 30 minutes or until center is almost set. Cool completely. Refrigerate several hours or until chilled. Cut into 32 squares to serve. Store leftovers in tightly covered container in refrigerator. Makes 32 squares. Source: Recipe Adapted from Kraft Foods 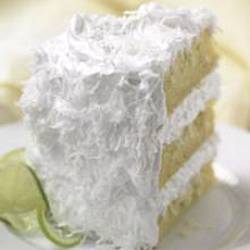
Holiday Coconut CakeServings: Makes 1 (3-layer) cakeComments: Fresh Coconut Cake is the very essence of the holiday season. Serving this very special cake for your Kwanzaa, Christmas or Hanukkah dessert will bring you many complements and requests for the recipe. If you can't find fresh coconut at your local market, use packaged shredded coconut instead. Your cake will still taste delicious. Ingredients: For Cake: 1 cup (2 sticks/8oz./226g) unsalted butter, softened 2 cups granulated sugar 4 large eggs 2 3/4 cups all-purpose flour 2 teaspoons baking powder 1 teaspoon salt 1 cup milk 1 1/2 teaspoons vanilla extract 1 1/2 teaspoons almond extract For Coconut Syrup: 2 tablespoons granulated sugar 1/4 cup fresh coconut milk Boiled Frosting (see ingredients and instructions below) Extra Ingredients for Filling and Garnish: 2 to 3 cups fresh shredded coconut, (sprinkled over filling, and for tops and sides of cake after frosting) Instructions: For Cake: 1. Beat butter at medium speed with an electric mixer until creamy; gradually add 2 cups sugar, beating well. Add eggs, 1 at a time, beating until blended after each addition. 2. Combine flour, baking powder, and salt; add to butter mixture alternately with milk, beginning and ending with flour mixture. Beat at low speed until blended after each addition. Stir in flavorings. Pour batter into 3 greased and floured 9-inch round cake pans. 3. Bake at 350 degrees F/180 degrees C for 20 to 25 minutes or until a wooden pick inserted in center comes out clean. Cool in pans on wire racks 10 minutes; remove from pans, and cool on wire racks. For Coconut Syrup and Frosting: 4. Combine 2 tablespoons sugar and coconut milk. Microwave on HIGH 30 seconds; stir until sugar dissolves. Brush 1 cake layer with half of coconut milk mixture, leaving a 1/2-inch margin around edges. Spread with 1 cup Boiled Frosting (ingredients and instructions for Boiled Frosting follow), and sprinkle with 1/2 cup shredded coconut. Top with second cake layer, and repeat procedure. Top with remaining cake layer. Spread remaining frosting on top and sides of cake; sprinkle with remaining coconut. Makes a 9-inch round 3-layer cake. Note: Cover and chill cake for easy slicing. Boiled Frosting Ingredients: 1 1/2 cups granulated sugar 1/2 cup water 4 egg whites 1/2 teaspoon cream of tartar 1/8 teaspoon salt 6 large marshmallows, cut into small pieces Instructions: 1. Combine sugar and water in a heavy saucepan. Cook over medium heat, stirring constantly, until mixture is clear. Cook, without stirring, until syrup reaches soft ball stage or candy thermometer registers 240 degrees F/115 degrees C. 2. While syrup cooks, beat egg whites at low speed with an electric mixer until foamy. Add cream of tartar and salt; beat at medium speed until soft peaks form. Increase to high speed, and add hot syrup in a heavy stream. Add marshmallows, a few pieces at a time. Beat until stiff peaks form and frosting is thick enough to spread. Makes 7 cups frosting Tips for Cracking Coconut Here’s how to open, clean, and shred fresh coconut. One coconut should yield enough meat and milk for this cake. Working over a pan or bowl, strike coconut with a hammer several times until coconut cracks in half. Strain coconut milk through a fine sieve, and set milk aside. Place coconut halves in a heavy-duty zip-top bag; seal. Strike with hammer to get several small pieces. Separate outer shell from meat with a dull knife (an oyster knife works well). Carefully cut away thin brown skin with a paring knife or vegetable peeler. Rinse coconut meat. Shred coconut in a food processor, using the fine shredder disk. Tightly pack chunks of coconut in food chute and shred, using firm pressure. Otherwise, you can use the largest holes of a box grater to shred coconut, just watch your knuckles. Recipe Adapted from: Christmas with Southern Living 2001. Recipe by Hazel Burwell. 
NEW YEAR'S*New Years Eve is celebrated on Wednesday December 31, 2008 and New Years Day is celebrated on Thursday January 1, 2009.Celebrating New Year's Eve What would New Year's Eve be like without the fireworks, the Ball dropping in Times Square, singing Auld Lang Syne and rockin' out with Dick Clark? Prior to 1904, New Year's Eve was celebrated in Herald Square with much less pomp and partying. However, several innovations transformed New York that year: the invention of neon lights, the opening of New York's first subway line; and the first celebration of New Year's Eve in Times Square. The New York Times had just completed building the Times Tower on an isolated triangle of land at the intersection of 7th Avenue, Broadway and 42nd Street - dubbed the "Crossroads of the World" - where commerce and culture collided. The newspaper's owner, Alfred Ochs, had successfully convinced the city to rename Longacre Square, the district surrounding the paper's new home, in honor of the his publication. On December 31, 1904, Ochs' new building was the focus of an unparalleled New Year's Eve celebration. An all-day festival concluded in a fireworks display ignited from the base of the tower. At midnight the raucous sound of cheering from over 200,000 merry makers was the genesis of a new tradition. However, two years later, the city banned the fireworks because they were too dangerous. Ochs was not deterred. He arranged to have an illuminated seven-hundred-pound iron and wood ball to be lowered from the tower flagpole (77 feet, 23 meters) precisely at midnight to signal the end of 1907. In 1914, The New York Times outgrew Times Tower and relocated to West 43rd Street. By then, however, New Year's Eve in Times Square had become part of our tradition. The use of a "time ball" by Ochs wasn't arbitrary and dates to 1829, when the first was erected in Portsmouth, England, as a way for sailors to synchronize their marine chronometers and, thereby, determining their marine position. Ochs, simply, converted that daily convention to signal the passage of time to be part of his annual tradition - and it stuck! The Ball drop has become a kind of metaphor for marking our own "positions" - where were we last year; where will we be next year? In 1942 and 1943, the Ball - as it's become known - was temporarily eliminated due to the World War II "lights out" in New York. Celebrants who continued to gather in Times Square during those years greeted the New Year with a moment of silence followed by the chimes from Times Tower. Today's Time Square New Year's Eve Ball was designed by Waterford Crystal and has been used since the ringing in of 2000. The Ball is a geodesic sphere, six feet in diameter, weighing 1,070 pounds. Covered with a total of 504 Waterford crystal triangles, ranging from 4.75" to 5.75", the outside of the Ball includes 90 computer-controlled rotating pyramid mirrors, able to reflect light across Times Square. Today, New Year's Eve in Times Square is a phenomenon, with hundreds of thousands of people continuing to gather at the Time Tower, now known as One Times Square, waiting in the New York winter. Thanks to satellite technology, a global audience, estimated at over one billion people, watches this ceremony each year. Celebrating New Year's Day on January 1st...but not always While most of the world now celebrates New Year's Day on January 1st, it was not always that way. If you had lived in Mesopotamia and Babylon 4,000 years ago (c. 2000 B.C.), you probably would have celebrated the new year in mid-March, at the time of the Vernal (Spring) Equinox. If, however, you were an Egyptian, your new year began with the Autumnal Equinox and the flooding of the Nile. If you were Greek, the Winter Solstice began your new year celebrations. All these seasons reflected a time of renewal, re-birth and regeneration. However, it was secular, civic and religious influences that eventually changed most "new year" celebrations to January 1st. Measuring time was, historically, determined by the easily observed cycles of the sun (solar), the moon (lunar) and of the regular occurrences of seasonal events that influenced agriculture. However, since solar, lunar and seasonal events were not consistent, formulating a reliable calendar evolved over eons. The earliest known Roman calendar designated March as the beginning of the new year, on the Vernal Equinox - the beginning of spring and a time when warring could begin, again. Depending upon whether one focuses on Mars or Martius as the derivation of that month's name, either interpretation is acceptable, as the return of spring begins a new crop season; and, with the winter ending, the weather was favorable for moving troops. Their calendar had ten named months, reflected in the historic, numerical names of six of the months. The origin of the names of the months were: March - Mars, Roman god of war; or, Martius - Roman god of fertility and vegetation April - perhaps derived from aperire - Latin from open; or, from Aphrodite, goddess of love and beauty May - Maia, Roman goddess of spring June - Juno, principle Roman goddess of marriage and the well-being of women July - originally Quintilis, Latin for 5th month, renamed for Julius Caesar in 44 B.C. August - originally, Sextilis, Latin for 6th month, renamed for Augustus Caesar in 8 B.C. September - septem, Latin for 7 October - octo, Latin for 8 November - novem, Latin for 9 December - decem, Latin for 10 Before 700 B.C. the calendar year began with the month of March, until the second king of Rome, Numa Pontilius, added the month of January and February. The month of January was named to honor Janus, a Roman god with two faces - one looking back and the other looking forward, signifying the old and the new. February is derived from Februa, the Roman festival of purification. The new year was, eventually, moved from March to January because it was the start of the civil year, when elected consuls, the highest officials in the Roman republic, began their tenure. Nevertheless, this new year date was not always observed, and in many places within the Roman empire, the new year continued to be celebrated on March 1st. In 46 B.C. Julius Caesar introduced a new, solar-based calendar that was an improvement on the ancient Roman calendar, which was lunar-based and had become inaccurate over the years. A lunar-based calendar is founded on the cycles of the moon - the synodic period. However, there is variation in the precise time for a specific lunation - the time between successive new moons - from 29 days, 6 hours, 35 minutes to 29 days, 19 hours, 55 minutes. Therefore, cumulatively, any lunar-based calendar will be "adding" time over any prolonged period. The Julian calendar, named for Julius Caesar, decreed that the new year would occur on January 1st. Julius wanted the year to begin in January since it celebrated the beginning of the civil year and the festival of the god of gates and, eventually, the god of all beginnings, Janus, after whom it was named. Combining these two celebrations joined the civil and the religious/pagan fetis, the genesis of the word festival. Romans traditionally exchanged gifts - strenae - of good omen on January 1, the Kalends (root of the word calendar) of January. These gifts included sweet dates, honey and coins. In addition, it was the beginning of the one year term for the consuls, who had a procession on January 1 and, also, wanted a good omen for their tenure. With Constantine (274-337 A.D.), the first Christian Roman emperor, New Year's evolved into a day of fasting rather than feasting, as had become the custom to celebrate Janus. In medieval Europe, however, the celebrations accompanying the new year were considered to have become pagan and unChristian. In 567, the Roman Catholic church, at the Second Council of Tours in France, abolished January 1 as the beginning of the year. Thereafter, at different times and in various places throughout medieval Christian Europe, the new year was celebrated on Dec. 25, the birth of Jesus; March 1; March 25, the Feast of the Annunciation; and Easter, which continues to be based on the lunar calendar. In 1582, Pope Gregory XIII re-established January 1 as new year's day with calendar reform. Today the Gregorian calendar has become the international standard for civil use. Although most Catholic countries adopted the Gregorian calendar, it was only gradually adopted among Protestant countries, who didn't recognize the Pope as their ecclesiastical leader. The British, for example, did not adopt the reformed calendar until 1752. Until then, the British Empire, and its' colonies, continued to celebrate the new year in March. In the beginning years of British America, Puritans disavowed any new year observances at all. Still associating any celebrations with pagan traditions, Puritans wouldn't speak the word "January," calling it "The First Month" because of the association with the pagan god, Janus. Given the various measures of time and the influence of power and the persistence of belief, the history of new year has been determined by shifts in liturgical, civic, religious, lunar, solar and seasonal variations. However, by all accounts, celebrating New Year's has been, and continues to be, a time of rejuvenation and renewal, whether reflected upon quietly, with piousness or with days of feasting and frivolity. Source: Holidays on the Net New Year's Eve Recipes
Kir RoyaleKir is a drink made from white wine embellished with a touch of crème de cassis, a black currant-flavored liqueur. When the drink is prepared with Champagne, it is called kir royale. Ingredients: 5 fl. oz. chilled Champagne or sparkling wine 2 tsp. crème de cassis 1 lemon twist for garnish Instructions: Pour the Champagne and crème de cassis into a Champagne flute and stir briefly. Garnish with the lemon twist. Makes 1 serving. 
Virgin CosmopolitansCranberry juice is featured in a nonalcoholic version of the cosmopolitan, replacing the usual vodka with fresh tangerine juice. It is a perfect drink for the winter holidays. Shaking the ingredients vigorously in a cocktail shaker as instructed below helps to chill and blend the contents thoroughly.Ingredients: Ice cubes 1 cup cranberry juice 1 cup fresh tangerine juice 1/4 cup fresh lime juice 4 lime zest twists Instructions: Put 4 martini glasses in the freezer to chill for at least 30 minutes. Just before serving, fill a cocktail shaker half full with ice. Pour in the cranberry juice, tangerine juice and lime juice. Cover with the lid and shake vigorously up and down for 10 seconds. Strain into the chilled glasses, dividing evenly. Garnish each glass with a lime twist. Serve immediately. Makes 4 servings. 
Bourbon TrufflesThe rich flavor of bourbon is a perfect partner to chocolate. Offer these delectable truffles with an assortment of cordials.Ingredients: For the Filling: 1/4 cup heavy cream 4 tbsp. (1/2 stick/2 oz/56g) unsalted butter 6 oz. milk chocolate, chopped 6 oz. semisweet chocolate, chopped 1/4 cup bourbon whiskey Dutch process cocoa powder for dusting For the Coating: 12 oz. semisweet chocolate, chopped 1/3 cup finely chopped pecans Instructions: To Make the Filling: In a heavy saucepan over medium-low heat, combine the cream and butter. Stir until the butter melts and the cream simmers. Remove from the heat. Add the milk chocolate and semisweet chocolate, and stir until melted and smooth. Mix in the whiskey, then pour into a bowl. Cover and freeze just until firm enough to mound in a spoon, about 40 minutes. Line the bottom of a baking sheet with aluminum foil. Scoop out the filling by tablespoonfuls and drop onto the sheet, spacing them evenly. Cover and freeze until almost firm but still pliable, about 30 minutes. Spread the cocoa on a flat plate. Roll each chocolate mound between your palms into a smooth ball, then roll in cocoa to coat evenly. Return the truffles to the sheet and freeze them while preparing the coating. To Make the Coating: Line a second baking sheet with aluminum foil. Place the semisweet chocolate in the top pan of a double boiler or in a heatproof bowl. Place over but not touching barely simmering water in the lower pan. Heat, stirring frequently, until melted and smooth. Remove from the heat. Reroll the truffles between your palms to remove any loose cocoa. Gently drop 1 truffle ball into the chocolate, tilting the pan if necessary to coat the ball completely. Slip a fork under the truffle, lift it from the chocolate, and tap the fork gently against the side of the pan to allow any excess chocolate to drip off. Using a knife, gently slide the truffle off the fork onto the prepared baking sheet. Immediately sprinkle generously with the pecans. Repeat with the remaining truffles. Refrigerate, uncovered, until firm, about 1 hour. Store in an airtight container in the refrigerator for up to 3 weeks. Makes about 18 truffles. 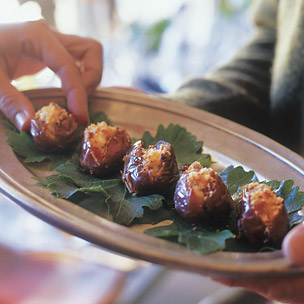
Dates Stuffed with Goat CheeseThese stuffed dates, which pair well with a welcoming glass of dry sparkling wine, are surprisingly simple to make. Medjool dates are sweet and rich and have thick, meaty flesh, which makes them particularly suitable for stuffing. A delicious New Year's Eve appetizer!Ingredients: 1 tbsp. olive oil 2 tbsp. fine dried bread crumbs 24 large dates, preferably Medjool 1/4 lb. soft fresh goat cheese Instructions: Preheat an oven to 375 degrees F/190 degrees C. Lightly oil a baking dish just large enough to hold the dates in a single layer. In a small fry pan over medium heat, warm the olive oil. Add the bread crumbs and cook, stirring constantly, until the bread crumbs are evenly golden brown, about 1 1/2 minutes. Remove the pan from the heat, transfer the bread crumbs to a plate and let cool. Using a small knife, make a small lengthwise incision in each date. Carefully remove the pits. Stuff 1 tsp. of the goat cheese into the cavity left by each date's pit. Arrange the dates, with the goat cheese side facing up, in the prepared dish. Sprinkle the bread crumbs evenly over the top. (The dates can be prepared up to this point up to 24 hours in advance. Store, tightly covered, in the refrigerator.) Bake the dates until warmed through, 10 to 12 minutes. Transfer to a serving platter and serve warm. Makes 6 servings (4 stuffed dates per serving). 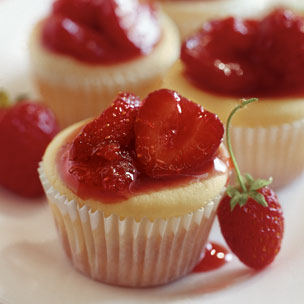
Mini Strawberry CheesecakesThese little indulgences are scaled-down versions of a dessert favorite: the classic New York cheesecake. They combine the sweet fruitiness of fresh strawberries with the rich creaminess of cheesecake, and they taste every bit as luscious as any full-size version.Ingredients: For the Topping: 1 lb. fresh strawberries, hulled and halved 1/2 cup plus 2 tbsp. granulated sugar 1 tbsp. fresh lemon juice For the Filling: 1 1/4 lb. cream cheese, at room temperature 3/4 cup granulated sugar 1/2 tsp. vanilla extract 1/4 cup sour cream 2 eggs, at room temperature 3 tbsp. all-purpose flour Instructions: To Make the Topping: In a nonreactive saucepan, combine 1/2 lb. of the strawberries with the sugar. Using a fork, gently mash the strawberries. Set the pan over medium-high heat and cook until the strawberries are softened, about 3 minutes. Remove from the heat and stir in the remaining 1/2 lb. strawberries and the lemon juice. Transfer to a small bowl and let cool completely. (The topping can be refrigerated in an airtight container for up to 2 days.) Preheat an oven to 350 degrees F/180 degrees C. Line a 24-cup miniature muffin pan with miniature paper or foil liners. To Make the Filling: In a bowl, using an electric mixer on medium-high speed, beat the cream cheese until fluffy, about 3 minutes. Reduce the speed to low, gradually add the sugar and beat until smooth, scraping down the sides of the bowl as needed. Add the vanilla and sour cream and beat until combined. Add the eggs one at a time, beating well after each addition. Add the flour and beat until combined. Divide the filling evenly among the prepared muffin cups, filling each about three-fourths full. Bake until the cheesecakes are just set in the center, about 15 minutes. Transfer the pan to a wire rack and let the cheesecakes cool in the pan for 5 minutes. Using a small offset spatula, transfer the cheesecakes to the rack and let cool completely, about 45 minutes. Refrigerate the cheesecakes in an airtight container for at least overnight or up to 3 days. Spoon about 1 tbsp. of the strawberry topping onto each chilled cheesecake and serve immediately. Makes 24 mini cheesecakes. Until Next TimeI sincerely hope you've enjoyed reading about the different holidays and that some of the desserts, etc. have peaked your interest. Please email me after the holidays and let me know if you made any of these goodies and how you liked them. As you can see, most of the recipes are somewhat fattening and rich, but the Christmas Gingerbread Cake recipe is one made with Splenda and is just fantastic. I made it last year and got raves! I wish all of you a happy and peaceful holiday and that you bring in the New Year 2009 with a hope for "peace" in the world and good things for your own families and friends. I'll be back "next year" with a new edition of Diana's Desserts Newsletter. Hopefully, it will be in February, just in time for Valentine's Day. Sincerely, Diana Diana's Desserts Diana's Desserts
A Website Dedicated to Home Bakers http://www.dianasdesserts.com E-mail Address: diana@dianasdesserts.com This email was sent to [email]. You can instantly unsubscribe from these emails by |