Tips for Halloween
Halloween Celebration Tips for You and Your Children
By Mary Manguso, Colorado State University
It's coming! That spooky night, that one night of the year when the ghosts and goblins are out in force, Halloween.
If you are a parent who worries about Halloween safety, you can quell your fears with a little forethought about the Halloween experience. The following tips will help you make the Halloween celebration safe and fun for your children. It even suggests healthy ideas for treats and parties.
Costumes
Because a parent's number one concern is for the safety of their children, these tips for the National Safe Kids Campaign in Washington D.C. will set your mind at ease. They come from Heather Paul, Ph.D., executive director of the organization.
1. A costume should be a good fit so that a child will not trip on long hems.
2. Sensible walking shoes are important so that children can be comfortable trick-or-treating around the neighborhood. A five-year-old in adult's high heel shoes may have fun prancing around the living room, but will be miserable when walking several blocks in them.
3. Choose costumes that are non-flammable. This information will be printed on the tag with the words "flame-resistant." If a child is wearing a homemade costume, be aware of the type of material you choose. Flimsy or billowing material can be flammable, and that's important because children could come in to contact with lighted jack-o-lanterns or other sources of flame.
4. Place reflector tape on your children's clothes and your own for that matter. You can find the tape at local discount and fabric stores. This will help drivers see you and your children more easily.
5. If at all possible use non hypoallergenic makeup on your child's face instead of a mask. Masks tend to fall off and block vision. This also will give children a chance to be creative and come up with their own costume ideas.
Trick-or-Treating
Young children always should be accompanied by an adult. If possible take your children trick-or-treating when it is early and still light out. Only approach houses where the outside light is turned on, a good sign they are expecting children. Parents need to check candy when children get home. Tampering is rare, but better safe than sorry. Throw out any treats that appear questionable.
Treats
Although giving out the treats is almost as fun as getting them, (if you're an adult!) take into consideration that children will be getting a lot of candy. You might want to hand out healthier snacks that are lower in fat and sugar. This would include such items as mini mint patties, fruit roll-ups, individual servings of microwave lowfat popcorn and mini boxes of raisins. You also may want to consider items such as pencils, stickers or small toys.
Parties
Halloween parties are a great idea! Consider throwing a party at your church or for a club your to which your child belongs. A block party would be a terrific way for children and adults in the neighborhood to get to know each other. Party costs can be shared among parents.
If you are lacking party ideas, check your local library for books and magazines for thoughts about how to make your child's Halloween party fun. Here are a few party ideas to get you started.
1. How about bobbing for apples or musical chairs to the Monster Mash song?
2. Use dry ice to create a spooky vapor coming from a cauldron. Use extra caution when handling ice around children. Wear gloves when handling the ice.
3. With mom and dad's help, making a haunted house is a fun way for children to help get ready for the party.
Just because you're having a party doesn't mean food must be high in fat and sugar. Food with less fat and sugar doesn't have to be boring and tasteless. This goes for adult parties as well. Consider these tips to make a party more healthful.
1. Instead of sugar drinks, try 100 percent fruit juices in your punch.
2. Serve "finger foods" that could include baby carrots, low fat cream cheese, sliced almonds and salsa. Place cream cheese on carrot tips and press in almonds to get a literal "finger food."
3. Use cookie cutters to shape sandwiches into pumpkins, witches and ghosts.
4. Try the following recipe for yummy Confetti Cupcakes that are sure to be a big hit!
5. Have a safe and fun Halloween!
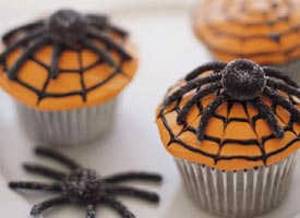
Confetti Cupcakes with Chocolate Glaze
Ingredients:
Vegetable oil spray (optional)
1 (18 1/4-ounce) package light or regular white cake mix
1 1/2 cups water
3 egg whites
2 tablespoons multicolored (or orange) candy sprinkles
Chocolate Glaze (recipe follows)
Instructions:
Preheat oven to 350 degrees F. Use paper baking cups or spray muffin pan with vegetable oil. In a large mixing bowl, combine cake mix, water, and egg whites. Beat with an electric mixer on low speed until combined. Beat on medium speed for 2 minutes. Fold in sprinkles. Bake cupcakes in preheated oven for 15-20 minutes or until a toothpick inserted near the center comes out clean. Cool cupcakes completely on wire rack. Glaze and decorate. Cupcakes can be stored for 3-4 days in an airtight container.
Chocolate Glaze:
1 cup milk chocolate or semisweet chocolate chips
Place chocolate chips in a small plastic bag with tight-fitting seal. (a freezer bag works well). Place bag in a bowl of hot water and let stand about 5 minutes or until chips soften and melt (you also could microwave on low for 15 seconds at a time). Cut a small tip off one corner of the bag. Decorate cupcakes in a spiderweb pattern if desired.
Makes 24 cupcakes.
Nutritional Information
Serving Size: 1 cupcake
Calories: 105
Cholesterol: 2 mg
Fat: 2 g
Recipe from American Heart Association's "Quick & Easy Cookbook," 1995.
Tips for Picking and Carving a Pumpkin
If you're looking for a great pumpkin to carve this Halloween season, take a cue from Linus and head directly to the patch. To locate a commercial grower in your area, contact your state agriculture department. Then you can call the farm directly to inquire about hours, prices and available varieties (Connecticut Field, Howden and Baby Bear are good bets for carving; Small Sugar, Golden Cushaw and White pumpkins are choice for pie making). Ask if the pumpkins are displayed at a stand or if you can harvest your own from the field. Do they charge by the pumpkin or the pound?
Once there, after your family has surveyed the lot, you're probably in for a patch-side debate over the perfect specimen. Whether you plan to decorate with a row of small and medium-size globes or a single huge one (the largest one on record was grown in Washington state and weighed a whopping 827 pounds), be sure the pumpkin you choose is symmetrical enough to rest squarely on a flat surface. Pass over any with bruises, cracks or broken stems, because they tend to deteriorate quickly.
Plan on carving no earlier than a day or two before Halloween as Jack o'Lanterns have short "step" lives. And remember to bring your porch pumpkin indoors on nights when the temperature is expected to drop below freezing.
Carving Tips
Draw your design on the pumpkin with a water-based marker beforehand. Mistakes are erased easily with a damp sponge.
Cut the top and any large areas with a sharp, straight-edged knife. A dull blade is not a safer alternative.
Serrated metal saws, now widely available in carving kits, are a safer alternative to knives and allow younger children to get in on the action.
Carve away from yourself; kids should carve only under adult supervision.
Never hold the knife in a stabbing position.
When carving, keep a portion of the knife blade in the pumpkin and use slow, steady saw strokes.
Cut the lid at an angle so the outside diameter is larger than the inside.This prevents the top from falling into the pumpkin when it shrinks.
Scoop out seeds and stringy flesh with a large spoon or ice cream scooper.
Carve the facial features closest to the center first and work outward. Cut out the larger features in sections.
Use an X-Acto knife for details and the tip of a potato peeler to make small circles and curves.
Remove carved portions by gently pushing them into or out of the pumpkin.
Reattach a section that is accidentally removed by using a toothpick to pin it back in place.
Make design holes large enough to provide adequate ventilation for the candle.
Flatten a spot in the base of the pumpkin for the candle but avoid digging too deep because the pumpkin becomes prone to rot.
Make sure the flame is not too close to the top of the pumpkin.
To prolong the life of the jack-o'-lantern, seal in moisture by coating all cut surfaces with petroleum jelly or vegetable oil, or cover it with a damp towel when not on display.
Consider giving smaller children stickers, tempera paint, or markers to decorate their own pumpkins.
Carving a Pumpkin and More
For a brief few days this October, Jack o'Lanterns will flicker across America (and other countries also), the happy result of wicked imaginations, fun-filled family afternoons and lots of elbow grease. If your family is raring to carve pumpkins this year, we've got the scoop on how to do it right. Below you'll find a step-by-step carving guide and tips for novice and veteran sculptors alike.
Choose a Pumpkin
Whether you're picking your own or perusing a farm stand or grocery store, look for pumpkins that are large, ripe and have smooth, even surfaces and at least a 2-inch stem (stemless, dented and bruised pumpkins may already be in decline). If you plan to light your jack-o'-lantern with a candle, the pumpkin should be at least 9 inches high.
Make a Pattern
To design your own jack-o'-lantern, take a cue from your pumpkin--is it tall, squat or blessed with a curly stem or irregularity you can incorporate into the design? What's the mood going to be-- scary, goofy, artistic, just plain weird? Once you have a plan, sketch your pattern with pencil and paper. If drawing freehand doesn't appeal, or if you're aiming for a complex pattern, use a stencil or template. You can use the templates offered here or those available on the Web and in carving kits.Cut Out The Top (Or Bottom)
To make a lid, draw a circle or a hexagon at least 5 inches in diameter around the pumpkin's stem. Cut out the lid at an angle (so that the outside edge is larger than the inside) to keep it from slipping inside. For a carving tool, we recommend a pumpkin saw. Those using knives should carve gently and steadily. (Tip: Don't slide the knife all the way out of the pumpkin.) When the lid is free, scrape it clean of seeds and pulp. Instead of removing the top, you may choose to remove a section from the bottom or side of the pumpkin. (This works well for an unstable or small pumpkin, or for certain designs, such as The Goodnight Moon pumpkin.)
Scrape Out The Inside
This delightfully slimy job calls for a large metal spoon or an ice-cream scoop. Little kids can easily remove all the seeds and mushy stuff. Then a stronger pair of hands can take over scraping. The thinner the wall, the easier it is to carve and the brighter your lantern will be. Scrape until you've had enough or until the wall is 1 to 1 1/2 inches thick (stop before you compromise the strength of the walls). At the base, flatten a spot for the candle (again, don't make it too thin, or the bottom will rot).
Transfer The Pattern
There are two ways to transfer your design onto the pumpkin. One is to copy it freehand onto a clean, dry pumpkin with a water-based marker (mistakes can be easily corrected with a paper towel). The other is to tape your pattern or template to the pumpkin, then score the design into the skin by poking holes through the pattern with a nail or plastic poking tool (available in some pumpkin-carving kits).
Carve!
Okay, now you're ready to sculpt. Start at the center of your design and work outward (this avoids putting pressure on areas already carved). Begin with the innermost and smallest features--eyes before eyebrows, for instance--and try to carve the inside lines of each feature before the outside lines. Be gentle: If you're using a knife, run it over each line a few times, rather than pushing all the way through. Don't cut all the way to the end of a line on the first cut. As each shape loosens up, gently push it out of the pumpkin with a finger or a dull pencil point (a good job for small kids). Larger shapes, such as gap-toothed grins, may have to be removed in pieces.
Tip:
If you cut something you didn't intend to, perform an ad hoc pumpkin surgery: Stick a toothpick through the flesh side of the piece and fit it back into place.
Experiment With Shading
You can create dramatic effects by letting candlelight through the pumpkin in varying intensity. For a shaded effect, don't cut all the way through the pumpkin. Instead, make a shallow, angled (or V-shaped) cut (1/8 to 1/2 inch, depending on the thickness of the pumpkin wall), then peel away the outer flesh with a knife tip, spoon or vegetable peeler. You also can use deep, angled cuts to remove larger pieces, so that the light reflects off the walls of the hole.
Test-Drive Your Pumpkin
Now is the moment of truth. Place a candle inside your pumpkin (votives are more stable than tapers). Light the candle, put on the lid and turn out the lights. If the candle doesn't stay lit, increase the air supply either by enlarging some of the features or by carving a vent on the back of the lid. Lastly, put your jack-o'-lantern in a place of honor (away from flammables) and remember to blow out all candles before you go to sleep.
Source: FamilyFun.Go.Com
Roasting Pumpkin Seeds
The seeds of the pumpkin can be cleaned off and toasted to serve as a snack or to use in recipes as an ingredient or a garnish. Toasting makes the hulls crisp and edible.
1. Wipe or pick off any pumpkin flesh or strands from the seeds. Sauté the seeds in a little canola oil until lightly browned.
2. Transfer them to a baking sheet and sprinkle with salt.
3. Bake in a preheated 350°F/180°C oven until crisp, about 10 minutes.
4. Drain on paper towels, cool and store in a covered container in the refrigerator for up to 1 month.