Basic Tips and Techniques
Folding
What is Folding?
Folding is a delicate technique used to mix or incorporate ingredients thoroughly into a batter without deflating either the batter of the ingredients or mixture folded into it. It is always done by hand, with a rubber spatula, rather than with a mixer. Cut down into the center of the batter and sweep the spatula up the side of the bowl, scooping up batter from the bottom of the bowl and bringing it to the top. Repeat the folding stroke, giving the bowl a partial turn after each, until the batter is uniform. Folding beaten egg whites into a batter is required in many recipes and is an important skill to master.
To fold beaten egg whites into a batter: Be sure to choose a bowl that is large enough. Some cooks fold with a whisk; we prefer a large rubber spatula. Use the spatula to scoop about one-quarter of the egg whites onto the top of the batter. Use the edge of the spatula to cut through the middle of the egg whites down to the bottom of the bowl. Draw the spatula toward you, scraping a big scoop of batter up the side of the bowl, and lift and turn the spatula so that the batter falls gently back on top of the egg whites in the center. Rotate the bowl slightly and repeat the steps, always cutting into the center of the biggest mass of egg whites as you proceed. When these first egg whites are well incorporated, scrape all of the remaining egg whites on top of the batter and fold them in as described.
Source: Pastryitems.com
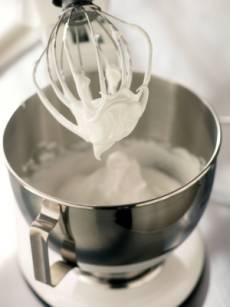
How to Whip Cream and Recipe
Makes 2 cups whipped cream
Ingredients:
1/2 pint (1 cup) Whipping Cream or Heavy Whipping Cream
3 tablespoons confectioners' sugar (icing sugar)
Optional
Vanilla extract, or other flavorings LiqueursInstructions
Place mixing bowl of an electric mixer and whipping attachment in the freezer for at least 15 minutes. If you can't use freezer, place bowl and whipping attachment in refrigerator for at least one hour.
Place whipping cream in freezer for about 5 minutes, be careful not to freeze it, or keep whipping cream chilled in refrigerator until ready to use.
Pour whipping cream into mixing bowl. Attach bowl and wire whip to mixer.
To avoid splashing, start whipping cream on low and gradually turn up the speed. When the cream begins to bubble, increase the mixer speed to medium high.
To Make Sweetened Whipped Cream
Add up to 3 tablespoons of confectioners' sugar or superfine sugar for each cup of cream. When done, the whipped cream will droop slightly from the ends of the beaters when lifted. It will also leave light traces on the surface while beating.Adding Sugar and Flavorings:
You will get more volume from whipped cream if you hold off from adding sugar or flavorings like vanilla or liqueurs, until just before the cream becomes soft and billowy. Make sure you slowly add them at the side of the bowl while whipping.
Makes 2 cups whipped cream.
Because your electric mixer whips so quickly, there are just a few seconds between whipping stages. Look for these characteristics:
Cream begins to thicken.
Cream is thick and custard-like.
Cream starts to hold it's shape.
Cream forms soft peaks when wire whip is removed.
Can be folded into other ingredients when making desserts.
Cream becomes "stiff".
Cream stands in stiff, sharp peaks when wire whip is removed. Use for topping on cakes or desserts, or for cream puffs, etc.
Toasting Nuts
How to Toast Nuts
It most often seems that when you come across a recipe that requires that the nuts be "toasted", then chopped, there are very seldom instructions on How to Toast the Nuts. So I thought it would be a good idea to include the instructions on How to Toast Nuts under my Baking Tips and Ideas section of this website. Toasting nuts is really quite simple.
Here are 2 different ways to toast most types of nuts:
Oven-Toasting
1. Preheat oven to 350 degrees F (180 degrees C).
2. Toast nuts BEFORE chopping them into smaller pieces.
3. Place nuts in a single layer in an ungreased shallow pan or rimmed baking sheet such as a cookie sheet or jelly roll pan. (DO NOT use a baking sheet without sides or you may have nuts all over the oven if you accidentally tip the sheet when removing it from the oven.)
4. Bake 5 to 10 minutes or until they are golden brown. Some nuts, such as walnuts may look more GOLDEN than BROWN when toasted. They will continue to brown slightly after they're removed from the oven. Stir once or twice or shake the pan during toasting to aid in even browning.
5. Place toasted nuts on paper towels to cool.
6. After toasting and nuts have cooled, STORE any leftover toasted nuts in the refrigerator in an airtight container for up to 1 to 2 weeks.
Note:
The first time you try toasting nuts, it's better to err on the side of under-toasting than over-toasting. As the nuts toast, you'll notice a change in their fragrance as well as their color.
Stove-Top Toasting
Stove-top toasting works well for small batches of nuts. With this method, the parts of the nuts touching the skillet may become darkest, unlike the oven method where the nuts become more of an overall golden color.
1. Toast nuts BEFORE chopping them into smaller pieces.
2. Heat nuts in a dry, heavy skillet over medium heat for 1 to 2 minutes or until they're golden brown and they give off a rich, toasty fragrance. Watch the nuts closely when using this method as it's easy to burn them.
3. Stir or toss nuts frequently for even toasting.
4. Remove nuts from pan to cool. Place toasted nuts on paper towels to cool. Store cooled leftover toasted nuts in the refrigerator in an airtight container for up to 1 to 2 weeks.
How to Toast Coconut
1. Heat the oven to 350°F (180 C). Spread coconut evenly on a cookie sheet. Bake for 7 to 8 minutes or until light golden brown, stirring occasionally. Watch closely to avoid over-browning.
2. To toast in the microwave oven, spread coconut in a microwave-safe pan. Microwave on HIGH for 4 1/2 to 8 minutes, tossing the coconut with a fork after each minute.
To avoid over browning remove toasted coconut from baking pan immediately after baking or microwaving.
CLARIFIED BUTTER
What is Clarified Butter?
Clarified butter is unsalted butter that has been heated to the point that its water evaporates and the milk solids separate out. The resulting golden fluid is the clarified butter or pure butter fat. One pound of butter will yield about 12 ounces of clarified butter.
How to Clarify Butter
In a saucepan, heat "unsalted" butter on low heat. Some of the proteins will coagulate and produce a foam on the surface which you must skim off with a spoon. Continue to cook until the butter becomes clear and the remaining milk solids congregate on the bottom. Then either ladle or pour out the butter being careful not to include the milk solids on the bottom.
If you "just melt the butter" and fail to remove the milk solids, you will have just that: melted butter, not drawn or clarified butter.
Clarified butter is often preferred to regular butter for sautéing because it has a higher smoke point. This means it can be heated to a higher temperature than regular butter before burning. Those pesky milk solids are miniature kamikaze pilots, diving right to the bottom of your pan and burning themselves up. Without them, clarified butter will store longer as well. But they are not totally evil. They also provide flavor and thus, clarified butter is not as tasty as regular butter.
High Altitude Baking
What is High Altitude?
Areas that are 3,500 feet above sea level are considered to be high-altitude areas.
Cooking at High Altitudes
All cooking processes are directly affected by atmospheric pressure.
At sea level, water boils at 212º F, but on mountaintops and other high-altitude regions, the boiling point is much lower.
For about every 500 feet of ascent, the boiling point is lowered 1ºF.
At a 7,000 foot elevation, water would boil at about 198º F. Because the water is boiling at a lower temperature, it would take longer to cook food by boiling.
Baking at High Altitudes
Atmospheric pressure is less at high altitudes than at sea level or more normal elevations.
This lower pressure affects the baking of cakes in several ways.
Heat rises from the bottom of an oven, but since there isn't sufficient air pressure from above to balance this upward pressure, the cake tends to expand too rapidly. Air cells in the cake can break and escape because of this too-rapid expansion, resulting in a cake that will dip or fall.
Batter may overflow the pan due to the too-rapid expansion of the cake.
Cakes can remain underdone if temperature is not raised to adjust for the lower boiling point at high altitudes. Due to rapid evaporation of liquids at high altitudes, cakes must be carefully timed to avoid excess dryness.
High-Altitude Conversion Tips
To convert standard recipes into those that can be used for high-altitude baking:
Use 5% more flour to disperse the leavening action and slow down the rapid rise of the cake.
Use 20% more water to counterbalance the rapid evaporation of liquids at high altitudes and the extra flour added to the cake batter.
Bake about 25 degrees higher to help "set" the cake's crust.
Reduce baking time by about 20% to prevent overbaking at the higher temperature.
Fill pans 1/3 to no more than 1/2 full to avoid batter overflow caused by rapid cake expansion.
Use cold water and large, cold eggs to give cake extra strength
Generously grease and flour cake pans to prevent cake from sticking.
Remove top oven rack to prevent cake from sticking to it, since high-altitude cakes rise higher.
Have oven calibrated by a serviceperson periodically, since some thermostats are affected by altitude.
High-Altitude Cookie Adjustment
Only cookies with lots of chocolate, nuts, or dates need adjustment: Reduce baking powder/soda by 1/2.
At very high altitudes, a slight reduction of sugar may help.
Beating Egg Whites
Here are some tips and hints for beating egg whites so your recipe works properly:
For beating egg whites until stiff, use a small deep bowl with a rounded bottom for 4 to 5 egg whites; a large, deep bowl for more.
You will get more volume when beating egg whites if you first bring them to room temperature.
You can bring egg whites to room temperature by setting the eggs out on your counter at least 30 minutes in advance of your preparation. For a quick method, place the eggs in a bowl of very warm but not hot, water for 5 to 10 minutes. If the eggs are already separated, place the egg whites in a bowl in a pan of warm water.
The bowl itself can make a very big difference when beating egg whites. A copper bowl is ideal, since they react chemically with egg whites to form fluffy, high peaks. When using a stainless steel or glass bowl, add cream of tartar or lemon juice to achieve the same result as with a copper bowl. Avoid aluminum bowls which can cause whites to turn gray and also avoid using wooden or plastic bowls, which tend to absorb oils from other usages and can retard your whipped whites.
Egg whites will not increase to the desired volume if contaminated with any trace of oil or fat. This is also true if any yolk is present in the egg whites
The addition of an acid will fluff up your whipped egg whites. It stabilizes the whites and adds volume. Add 1/8 teaspoon of acid ingredient (such as lemon juice, vinegar, or cream of tartar) per egg white, except for meringues, where 1/8 is used for two egg whites. The acid should be added to the whites just as they begin to become frothy during beating.
Egg whites beaten with sugar combined will not peak as firmly, so if you must use sugar, add it slowly towards the end of beating.
It's best to begin with a slow speed and gradually move up to high when beating egg whites.
When your egg whites get fluffy...STOP! If you overbeat them, they will liquify again.
Use beaten egg whites right away. Don't let them sit.
Egg whites should not remain without refrigeration for more than 2 hours, which includes the preparation time, in order to reduce the possibility of bacterial growth. Egg whites cannot achieve their full volume on humid days.
Whites are perfectly whipped when they remain stable, even if you tip the bowl upside down.