Diana's Desserts - www.dianasdesserts.com
See more recipes in Breads - Biscuits - Rolls - Scones 
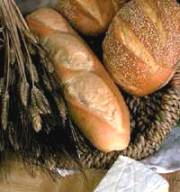
Italian Bread
in Diana's Recipe Book
 |
|
Average Rating:
(total ratings: 3) [Read reviews] [Post a review] |
| Servings: Makes 1 loaf |
| Comments: This is that great Italian Bread you see in the bakeries and at your supermarket. Wonderful served warm or at room temperature. Spread butter over it when it's warm, or use it for making sandwiches with your favorite deli meats. Start this recipe at least 24 hours before making the bread, as the "starter" has to rest at room temperature ovenight before using, and if you don't have "chlorine-free" water from your kitchen tap, you must leave your water for this recipe out (uncovered) overnight to eliminate the chlorine from it. |
| Ingredients: Overnight Starter: 3/4 cup aerated* (see note below)) unbleached all-purpose flour 1/2 cup lukewarm chlorine-free water or bottled water* (see note below) 1/8 teaspoon instant yeast Dough: 2 teaspoons instant yeast 2/3 cup water 2 3/4 cups unbleached all-purpose flour 1 1/4 teaspoons salt Topping; 1 egg white beaten with 1 tablespoon water Sesame seeds (optional) |
| Instructions: The Starter: Mix the starter ingredients in a small bowl, cover, and let rest at room temperature overnight. Manual Method: In a large bowl, combine the starter and the remainder of the dough ingredients, stirring till the dough starts to leave the sides of the bowl. Transfer the dough to a lightly greased surface, oil your hands, and knead it for 5 to 7 minutes, or until it's supple, but the surface is still somewhat rough. Transfer the dough to a lightly greased bowl or dough-rising bucket, cover the bowl or bucket, and allow the dough to rise for 90 minutes, turning it over and gently deflating it after 45 minutes. Mixer Method: Combine the ingredients as above, using a flat beater paddle or beaters, then switch to the dough hook(s) and knead for about 5 minutes; the dough should have formed a ball, but its surface will still be a bit rough. Transfer the dough to a lightly greased bowl or dough-rising bucket, cover the bowl or bucket, and allow the dough to rise for 90 minutes, turning it over and gently deflating it after 45 minutes. Bread Machine Method: Place all of the ingredients, including the starter, into the pan of your machine, program the machine for manual or dough, and press Start. When the cycle is finished, remove the dough, deflate it gently, and let it rest, covered, for 30 minutes. Transfer the dough to a lightly greased work surface, and divide it into three pieces. Roll each piece into an 18-inch rope. Braid the ropes (tucking the ends under), set the braid on a lightly greased baking sheet, cover, and let rise it rise for about 60 to 90 minutes, or until it's very puffy. Brush the braid with the egg white glaze. Sprinkle it heavily with sesame seeds (optional). Bake the bread in a preheated 425°F (218° - 220°C) oven for 25 to 35 minutes; the longer it bakes, the crunchier it'll be. Remove it from the oven and cool it on a wire rack (or cool it in the turned-off, door-propped open oven). Makes 1 loaf. NOTES: To Aerate: To "aerate" is to incorporate air into ingredients to make (in this recipe's case) flour lighter. Sifting flour is one example of this process. Although flour is no longer packaged in a way that causes it to clump in the bag, sifting is generally not necessary. However, it does settle, so if you’re measuring flour by volume as opposed to weight, aerate it before putting an amount into a measuring cup. Before measuring the flour for a recipe, take a spoon and "fluff up" the flour (in it's bag or container) first. Then sprinkle the "fluffed up" flour into a measuring cup until you have 1 cup of "aerated or fluffed up" flour. Do NOT pack the flour into your measuring cup. Aerating the flour you are going to use for any baking is best, unless a recipe specifically says not to sift or aerate. Chlorine-free Water: Make sure that the water you are going to use to make your "starter" with is chlorine-free, as chlorine will prevent your sourdough starter from turning out right. If the tap water from your kitchen faucet is chlorinated, take the amount of water that you need for the recipe (from your kitchen faucet) and pour it into a glass container and leave it out (uncovered) at room temperature overnight. This will eliminate any chlorine in the water. Bottled water may be used instead, if desired. |
| Source: DianasDesserts.com |
| Date: May 9, 2003 |
Reviews
Reviewer: dawn
Rating:
Rating:
Reviewer: Bill and Timmy
Rating:
Review:
Trying slight changes to see what happens. 1st loaf was very good, we ate it all the next day. Will try making 1 loaf like regular bread. Will try regular yeast in red packs. Having fun with the children making bread!
Rating:
Review:
Trying slight changes to see what happens. 1st loaf was very good, we ate it all the next day. Will try making 1 loaf like regular bread. Will try regular yeast in red packs. Having fun with the children making bread!
Reviewer: JGraves
Rating:
Review:
Unfortunately, I think the second/final rising time is too long. My bread OVER rose and looked like a blob after cooking. I used standard yeast, but I guess it just didn't work for me. Will try again tomorrow!
Rating:
Review:
Unfortunately, I think the second/final rising time is too long. My bread OVER rose and looked like a blob after cooking. I used standard yeast, but I guess it just didn't work for me. Will try again tomorrow!